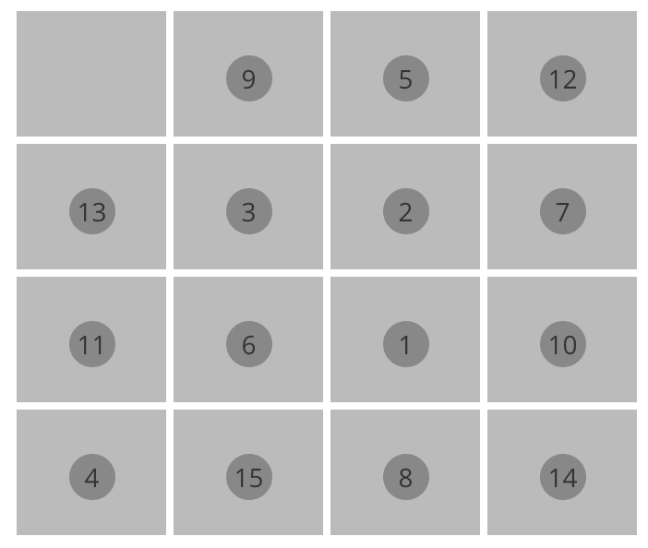
Writing a simple ReactJS Game App

Tile Game

Whenever I learn a new language/framework or library, I start with my favorite tile game app. The game itself is very simple. You will get a 4×4 tile board numbered randomly from 1 to 15 and one of the tiles will be empty. The goal is to sort the tiles in ascending order and keep the empty tile in first position or the last position. You can swap a numbered tile with the empty tile at a time and the tiles can move left or right and top or bottom.

tile_game

Choosing ES6 vs ES5

I started learning ReactJs using ES5 version of JavaScript and then later I switched to ES6 version of JS. The main reason for this is most of the modern browsers support ES6 and ES6 is very closer to object oriented languages like Java. The syntaxes are easy if you are a Java or C++ developer and much lesser code than ES5. Also, if you need to run your code in older versions of browsers like Internet Explorer, you can transpile ES6 to ES5 using babel transpilers.

Lets start

We need to create few files to start with. I used http://plnkr.co to learn ReactJs and it is very easy to create project for ReactJs. Just click on “Launch Editor” and then on the top of the editor click on New->React.js->React.js. It will ask you if you want to discard the unsaved changes, click on “Yes”.

Now that a new ReactJs project is created and you can click on the eye icon on the right top to preview the code. At the time of writing this page, the sample code doesn’t work and you need to go to the script.jsx file and rename “React.render()” to ReactDOM.render().

A simple component

Our first step is to create a simple component. I named this component as “Game” and this will be the main controller component. Creating a component in JSX is very easy.

class Game extends React.Component {
  constructor(props) {
    super(props);
  }

  render () {
    return (
<div id="game">
<h1>Tiles!!!</h1>
</div>
)
  }
}

The ReactJs component will extend from the ReactJs’s Component class and should initializes the constructor with the properties it received from the component instance. To render this new component we need to change the ReactDOM.render() function to use this new component.

ReactDOM.render(
<Game />,
 document.getElementById("container"));

More components

Lets create more components like,

Tile – to represent each tile

const Tile = (props) => {
  let className = "valid-";
  let isGameEnded = props.isGameEnded;
  let isValid = props.isValid;
  className += (isValid && !isGameEnded) ? "true" : "false";
  className += " col-xs-3";
  let num = null;
  if(props.number > 0) {
    num =
<div className="number">{props.number}</div>
}

  return (
<div className={className} onClick={() => {props.onClick(props.number   )}}>{num}</div>
)
}

TilesFrame – a frame to keep all the tiles

const TilesFrame = (props) => {
  let randomNumbers = props.randomNumbers;
  let tileClicked = props.tileClicked;
  let isGameEnded = props.isGameEnded;
  let tiles = [];

  let validIndexes = props.validIndexes;
  for (let i = 0; i < randomNumbers.length; i++) {
    let rNumber = randomNumbers[i];
    tiles.push(<Tile onClick={tileClicked} isGameEnded={isGameEnded} isValid={validIndexes.indexOf(i) != -1} number={rNumber}/>)
  }

  return (
<div id="tiles-frame">;
         {tiles}</div>
;
  )
}

DoneFrame – to capture the result and restart the game

const DoneFrame = (props) => {
  return (
<div id = "done-frame" className = "well text-center">
<h2>{props.resultMessage}</h2>
<button className="btn btn-default" onClick={props.resetGame}>
         Play again
      </button></div>
)
}

The final code

I have the final code at http://embed.plnkr.co/oVIVcBlgxWaxKXoAJmfo/

A simple Node JS library

The first problem that I faced while working on JavaScript development is creating reusable libraries that can work on node and on browsers. I wanted a simple start from scratch tutorial and so I ended up creating my first blog.

Tools required

  1. Install NodeJS from https://nodejs.org
  2. Any text editor (I use atom from https://atom.io)

Lets Begin

At first we need to install some node modules that are required for setting up our development environment.

To initialize the new node module we need to create package.json that will store the configuration of the app. Run the below command in your terminal/ command prompt  and provide the info it asks.


$ npm init

The node modules follow the syntaxes of Common-JS modules whereas it is not supported by the browsers yet. Lets write a simple javascript file that supports both node and browsers.

Directory structure

I followed the below directory structure for my js library.

simple

app

math.js

tests

test-math.js

app.js

app.html

package.json

karma.conf.js

In a browser, window is the global object where as in node it is called exports (alias for module.exports). I’ve taken addition of two numbers as the simple javascript library.

We can follow a test driven approach for writing our code. Our library is going to be call “math” and “math.add(a, b)” will be function which adds two numbers a, b and returns the sum of it. I used jasmine as the unit test framework.


describe("the add function", function () {

it("should return 30 for inputs 10, 20", function () {

expect(math.add(10,20)).toEqual(30);

});

});

As we are going to write the script compatible with the I chose karma test runner. Run the following commands in the terminal to install the required packages.


$ npm install karma-cli --save-dev

$ npm install karma-jasmine --save-dev

$ npm install karma-phantomjs-launcher --save-dev

I used PhantomJS as the browser. The “–save-dev” option is used to store the dependencies in the package.json. You can also install the packages globally by using “-g” option. Now run the following command to create the karma configuration file (karma.conf.js). You can give “./app/math.js” and “./tests/test-math.js” where it asks for the JS files to be loaded and give PhantomJS as the launcher.


$ karma init

After creating the karma.conf.js, the run the below command to start the karma runner. It will continue to run and monitor for any changes in the files added while configuring.


$ karma start

So our first step will be to create a common global object that references either window/this or the exports object.


var global = (typeof exports === "undefined") ? this : exports;

Next step would be making you script understand that you are using global object to export the functions and properties.


(function(global) {

global.exported_function = function () {

//some code here;

};

})(global);

Next step is to change the implementation of the above function to include our math library.


// math.js

(function(global) {

global.math = (function () {

return {

add : function (a, b) {

return a + b;

}

};

})();

})((typeof exports === "undefined") ? this : exports);

Now see the terminal where the karma test runner is running. This should pass the test case.

Let’s make the function even more generic in terms of namespace as below.


// math.js

(function(global, ns) {

global[ns] = (function () {

return {

add : function (a, b) {

return a + b;

}

};

})();

})((typeof exports === "undefined") ? this : exports, "math");

Now we can create the app.js (the main file for our node module) and app.html to check whether our code runs on the server or not.


You can now open the html file in any browser to see the result. The app.js file looks like below.


// app.js

var math = require("./app/math.js").math;

console.log(math.basic.add(10, 20));

Run the following command in the terminal to run the code in node.


$ node app.js

This concludes the steps to create a simple single file JS library that works on browser and node without the need of third party libraries.

In my next blog, I will explain about writing multi-file javascript library which can be used in both browser and node.